• As of January 16, 2018, all posts in this section are moderated. Please engage with the community within the rest of the forums, remembering that you may not post your own tutorial links outside this section. Also remember to put your content in the proper space.

    Tutorials posted outside this space will be removed. If you post a tutorial in this space and you don't make an effort to participate in the community outside this section, your post will be deleted.

*~Basic brow tutorial~* (both plucking and filling in)

Mien

Well-known member
Hey all,
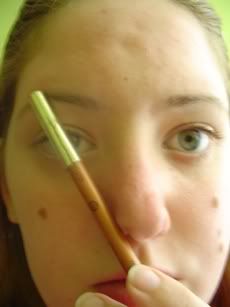
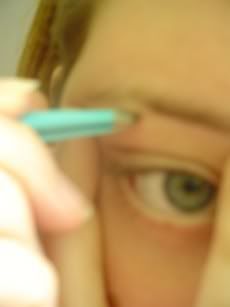
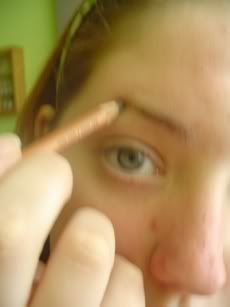
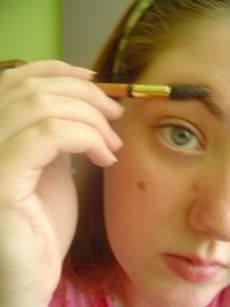
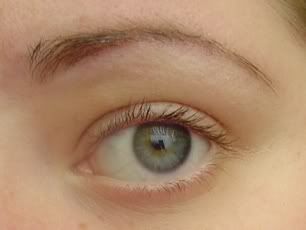
I made this tutorial for some Dutch girls, I do not consider myself a browspecialist and it's very basic so most of you probably already know this stuff. Still I decided to post this, maybe it does help someone
smiles.gif

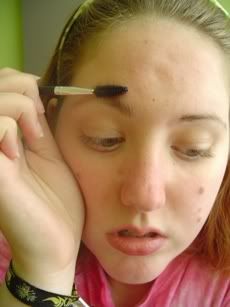
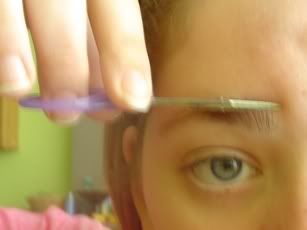
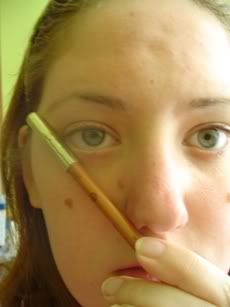
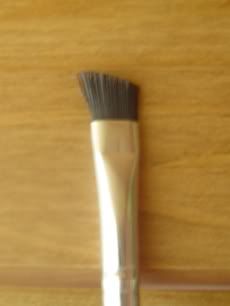
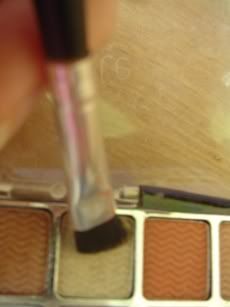
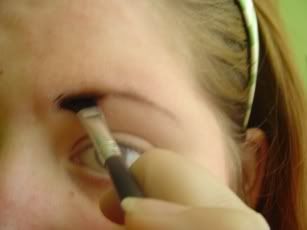
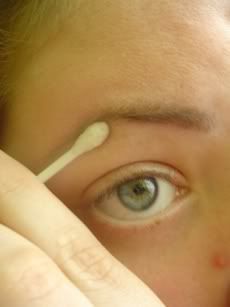
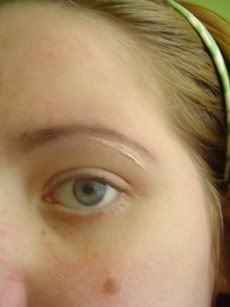
The first part is about theplucking an shaping ofthe brows, 2nd part is about filling them in.

This is my very first tutorial and I'm not good at taking pics, especially not when I'm demonstrating something with both hands
lmao.gif
So any comments and sugestions are welcome,

Thanks for looking, hope you'll enjoy!
xx Mien

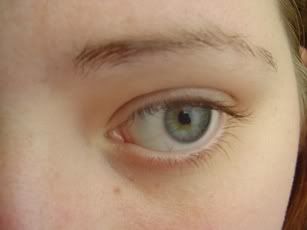
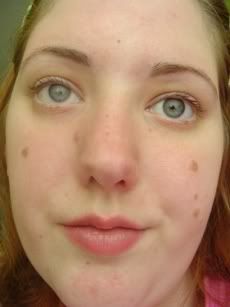
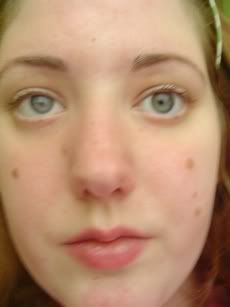
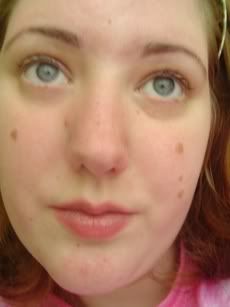
*I'm not wearing any MU (apart from lipbalm) in these pics, I'm a bit ill and I think y'all can see that, lol*

This post was too long, so the rest is in the next post
smiles.gif
 

Mien

Well-known member
  • Allways start with a cleansed face, without any MU, also be sure all of your tools are clean. If your skin is irritatedor you have ome wounds, please wait with plucking, 'cause it then is more likely you'll get some infections.
browtut01.jpg

  • As you see my onplucked brow is somewhat unruly, this isn't just because of hairs that are out of place, it's also because some hairs are just too long, so they are bend downwords. (see first pic, especialy at the arch) We're gonna do smthing about that, so brush all your hairs upwords:
browtut02.jpg


  • Now take little siccors (mine ae from a manicureset) and cute the hair so they are about the same size your brow is thick (appr. 0,5 cm):
    browtut03.jpg

  • Now brush all the hairs downwords and do the same, see how much difference this makes; some hairs you wanted to pluck don't need to be plucked anymore.

  • Now we can pluck! But wat hairs have to stay and wich ones will have to go? There's a simple tric to it: Take a pencil or brush and hold it along the side of your nose, like so:
browtut04.jpg

All the hairs that are between your pencil and the other brow you can surely remove.

  • Next put the pencil from the side of your nustril to the oithr ornr of your eye, like so:
browtut05.jpg

Where the pencil hits your brow shoul be the end of it.

  • Then there's a third point importent to know: the highest point of your brow, were the arch is. To find this point look straight into the mirror and hold the bruh aside your nose once again. Let the pencil go across the middle ofyour eye (your iris and pupil). The place where the pencil meets your brow, should be(come) the highest point:
browtut06.jpg


  • Some people naturally have more arched brows than other, you can change some of tht, but don't change it to muc. What looks great on others might not flather your face. You can make the brw thinner, be careful not to removehairs on the top of the brows, those are likely to gro back in different directions and more curly. After the highest point the brow becomes thinner.

  • Now lets start plucking
    smiles.gif
    Pull your ski thight with 2 fingers, look in the mirror and pluck teh hairs one by one. Keep looking in the mirror; not only to your brows but also take the time to look at your entire face to see if yor still on the right track. It mght be better to switch brows a couple of times duing the plucking, this will help kep them even and decrease the chance of overplucking:
browtut07.jpg


  • The results:
browtut08.jpg


This next part is about the filling in of the brows. It is better not to do this right ater the plucking, it's just a daily MU routine.
 

Mien

Well-known member
  • Look at your brows, are there any bold parts or lighter colored? Take your pencil and start at the beginning of yur brows, making little stripy movements in your brows, pay more attention the the spots you've just discovered:
browtut09.jpg


  • It's importent your pencil is sharp if not it may be even thickr thanyour brow itself
    smiles.gif
To get rid of any harsh lines brush your brows: (many browpencils have a brush at the end)
browtut10.jpg


Results:
browtut11.jpg


Browpencils don't have that much staying power, mostly because there slightly greasy. To fixatethe pencil we can use powder, it will last langer. For this I use a stiff, angled bruh:
browtut12.jpg


Ofcourse there are special browpowders out there, but you can also use a (matte!) taupe, beige or brown e/s:
browtut13.jpg


With a sort of padding motion I press the powder into the brows, after that I go back with the same brush and make a few smooth strokes to equially sprad the powder:
browtut14.jpg


Results:
browtut15.jpg


Ofcourse you want your brows to stay in place. You can use some browgel for this. But you can also spray some hairspray on a browbrush and comb them into shape:
browtut16.jpg


It is possible you've spilledsme powder or so; take a cottonswab with some mild remover and run across the bottum of the brow, this will create a more defined line:
browtut17.jpg


To reallymake the brows stand out you can use a highlighter. It can be a pressed or loose powder or liquid one that has to be padded in with the ringfinger:
browtut18.jpg


And now, the final results:

browtut19.jpg


browtut20.jpg


Thanks for your attention, I hope this was helpfull to someone!

xx Mien
wavey.gif
 

Jools

Active member
thank you so much for the tut. I've been struggeling with my eybrows like forever! Since I got bangs last year it's not that visible anymore
graucho.gif
but now I'll definitely try to get them under control with your tutorial
 

Bianca

Well-known member
Thanks for the tutorial! I always let the beautician pluck my brows, I ruined them once and she forbade me to pluck them lol. Maybe this helps!
 

clumsydaisy

New member
how do u make sure the arch that u draw across is even on both sides? I keep on having trouble to actually make 'em somewhat even.
 

Mien

Well-known member
Thanks for your comments ladies!

@clumsydaisy, the trick where you use a pencil to determine where the highest point should be helpes you with that. Also it takes some practice and a lot of looking at your brows. A big help for me is the 'erasing' part, with the q-tip. Also there are brow stencils out there, wich will help you to get the feeling of it. I've recently got some with a browkit from essence, but I remember there also was a website selling a lot of different ones, I believe it's www.eyebrowz.com HTH!
 

Latest posts

Top