xsparkage
Well-known member
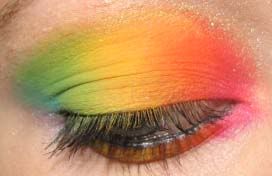
haha so i was bored, and a few people asked for a tutorial (im flattered! hehe) so i made one! first one too ;]
here is what i used-
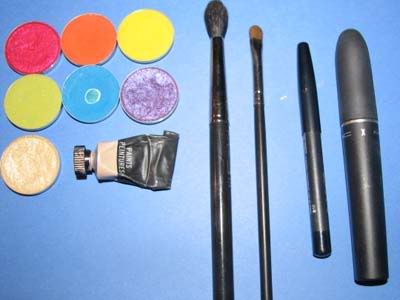
Bright Fuschia Pigment (mine is pressed, using it loose works just as well)
Orange e/s
Chrome Yellow e/s
Bitter e/s
Electric Eel e/s
Violet Pigment (again, its pressed)
Gold Dusk Pigment as a highlight (also pressed! haha, i loveee pressed pigments!)
Bare Canvas Paint as a base
Brush #228- Mini Shader Brush
Brush #224- Blender
Mascara X
Eye Kohl in Smolder
the key to this look is using a small brush for the shadows. youre only putting each shadow in a tiny place on your lid, so you want a small brush. my friend threw this brush in my basket at a CCO, and im in love. before this i would use the 219 pencil brush :]
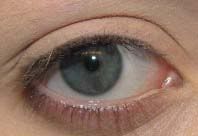
Put your base on your lid and blend it in, followed by a loose powder of any sort, so that your lids are nice and smooth and ready for shadows.
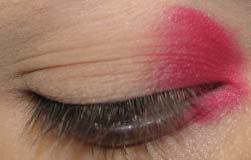
Load your 228 with bright fuschia (or any other bold pink color. i dont like using red, it kinda takes you out of the look as it doesnt really go with the flow, if you get what i mean) and put it on your inner lid, moving your brush side to side. only go out so far, and make sure it go around your tearducts so that you get the pink on your lower lashes as well :]
Next ofcourse, is orange! make sure youre blending the orange into bright fuschia very well, going side to side up your lid. we want zero harsh lines here. if you get too much orange over the bright fuschia, you can always go back later to add more pink :]
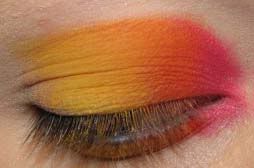
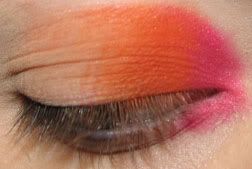
time for yellow! i like to make sure its in the middle of my lid, because i always have a problem of not being able to fit all the colors on, and purple always gets ripped off with no space :] again, make sure you go over the orange with the yellow, blending with your brush side to side moving up the lid. also, chrome yellow alone tends to look too matte for my liking. normall ill add some shimmery gold color (usually the yellowgold UD color from the deluxe shadows) but this time i didnt.
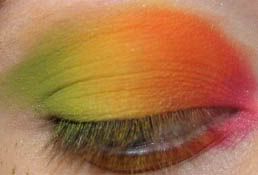
Bitter doesnt show up very green on its own, but we can fix that later. bitter blends well with chrome yellow, so you probably wont even have to think about it. dont forget to put your shadows on your bottom lid as well! :]
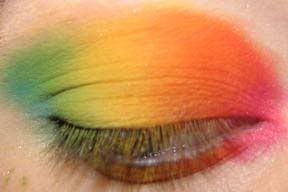
Electric Eel can be a little tricky. i always blend this one really carfully, going over Bitter so that it gives it more of a greener look. doing this will give you a line inbetween your green and yellow, so youll have to add a bit more chrome yellow to blend it out.
As i said before and as you can see, violet only gets a teeeny bit of space, but thats okay. i give it a nice line and it looks good.
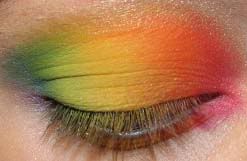
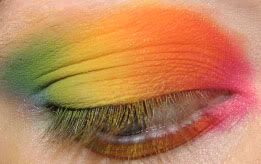
after ive added all my shadows, i always go back and put more above my crease because i want it to be more noticeable when my eyes are open. i just take a little shadow, and wherever the color was that i want higher, ill put it on the middle of my lid and just work my way up and blend it out when its as high as i want it, because harsh lines are a no no. after that, ill take my 224 and put just a bit of gold dusk and use it as a highlight. this will also make your shadows fade out and look all peachy keen :]
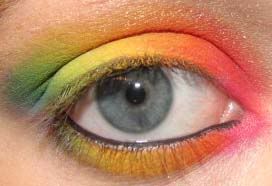
next is eyeliner. the way i do my eyeliner is ill line my waterline very heavily, then squeeze my lids shut a few times, and then reapply on my lower waterline. this will get the liner on your upper waterline, which i have a really hard time doing with a pencil (i poke myself and then get watery eyes and its a mess!) and this will make your upper lashes look fuller!

next, add mascara! make sure you move your brush back and forth to cover any shadows that may have colored your lashes!
what i also do (that i forgot to this time, haha) is take an angled brush, put some carbon shadow on it, and line my lashline with a really thin line, mainly in that little space where your lashes and lid meet. that will also take away some of the color you may get on top of your lashes, and will make them look fuller.
haha, im so wordy and confusing. this was done pretty quickly, so its not really as vibrant as it usually is, but i hope that was an okay tut!
 LMK what you thought, please!!
here is what i used-
Bright Fuschia Pigment (mine is pressed, using it loose works just as well)
Orange e/s
Chrome Yellow e/s
Bitter e/s
Electric Eel e/s
Violet Pigment (again, its pressed)
Gold Dusk Pigment as a highlight (also pressed! haha, i loveee pressed pigments!)
Bare Canvas Paint as a base
Brush #228- Mini Shader Brush
Brush #224- Blender
Mascara X
Eye Kohl in Smolder
the key to this look is using a small brush for the shadows. youre only putting each shadow in a tiny place on your lid, so you want a small brush. my friend threw this brush in my basket at a CCO, and im in love. before this i would use the 219 pencil brush :]
Put your base on your lid and blend it in, followed by a loose powder of any sort, so that your lids are nice and smooth and ready for shadows.
Load your 228 with bright fuschia (or any other bold pink color. i dont like using red, it kinda takes you out of the look as it doesnt really go with the flow, if you get what i mean) and put it on your inner lid, moving your brush side to side. only go out so far, and make sure it go around your tearducts so that you get the pink on your lower lashes as well :]
Next ofcourse, is orange! make sure youre blending the orange into bright fuschia very well, going side to side up your lid. we want zero harsh lines here. if you get too much orange over the bright fuschia, you can always go back later to add more pink :]
time for yellow! i like to make sure its in the middle of my lid, because i always have a problem of not being able to fit all the colors on, and purple always gets ripped off with no space :] again, make sure you go over the orange with the yellow, blending with your brush side to side moving up the lid. also, chrome yellow alone tends to look too matte for my liking. normall ill add some shimmery gold color (usually the yellowgold UD color from the deluxe shadows) but this time i didnt.
Bitter doesnt show up very green on its own, but we can fix that later. bitter blends well with chrome yellow, so you probably wont even have to think about it. dont forget to put your shadows on your bottom lid as well! :]
Electric Eel can be a little tricky. i always blend this one really carfully, going over Bitter so that it gives it more of a greener look. doing this will give you a line inbetween your green and yellow, so youll have to add a bit more chrome yellow to blend it out.
As i said before and as you can see, violet only gets a teeeny bit of space, but thats okay. i give it a nice line and it looks good.
after ive added all my shadows, i always go back and put more above my crease because i want it to be more noticeable when my eyes are open. i just take a little shadow, and wherever the color was that i want higher, ill put it on the middle of my lid and just work my way up and blend it out when its as high as i want it, because harsh lines are a no no. after that, ill take my 224 and put just a bit of gold dusk and use it as a highlight. this will also make your shadows fade out and look all peachy keen :]
next is eyeliner. the way i do my eyeliner is ill line my waterline very heavily, then squeeze my lids shut a few times, and then reapply on my lower waterline. this will get the liner on your upper waterline, which i have a really hard time doing with a pencil (i poke myself and then get watery eyes and its a mess!) and this will make your upper lashes look fuller!
next, add mascara! make sure you move your brush back and forth to cover any shadows that may have colored your lashes!
what i also do (that i forgot to this time, haha) is take an angled brush, put some carbon shadow on it, and line my lashline with a really thin line, mainly in that little space where your lashes and lid meet. that will also take away some of the color you may get on top of your lashes, and will make them look fuller.
haha, im so wordy and confusing. this was done pretty quickly, so its not really as vibrant as it usually is, but i hope that was an okay tut!
